
Calibration with a target
Target calibration links the camera's pixels to the part's millimetres, corrects perspective and lens distortion, and provides a rectified image at constant scale. Same parameters and same results as the equivalent Cognex tool.
Printing a target
The window's PDF button creates a vector target at exact scale: chessboard with or without an L mark, dot grid with or without axes, from A4 to A0, with a 100 mm check ruler. The type, the mark and the pitch can be carried over to the tool's settings.
Taking the image of the target
The target is laid flat, in place of the part. In the “Image” tab, the area D,E - G,H surrounds the target; “Prendre l'image de la zone et calibrer” (take the image of the area and calibrate) starts the detection.
Detected points and reference frame
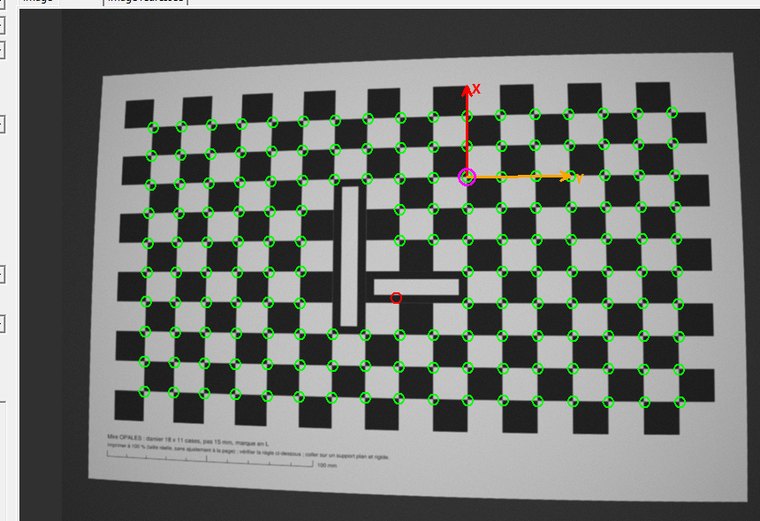
“Mire” (target) tab: each corner of the chessboard is found at sub-pixel level (green = retained, red = rejected). The L mark sets the origin and the X and Y axes of the target, wherever it is placed. The report gives the number of points and the RMS error: here 158 points, 0.098 pixel.
Rectified image
“Image redressée” (rectified image) tab: the image without perspective or distortion, at constant scale, which REPXCBO stores in a plane for the following measurements.
How the tool calibrates
The “i” badge at the top right sums up the six steps, with the settings of the open tool: target, detection, reference frame, model and error, rectified image, use in production.
